Signing and notarizing an Electron app for MacOS is not simple. Many guides are outdated or do not match your current requirements. Also, some steps are left to the user or link to incorrect guides. I recently had to go through this and decided to write this step-by-step guide for my future self...and for anybody else.
I will focus on:
- An Electron app built for desktop MacOS
- Using electron-builder as the build tool (it may still apply to other tools)
- Distributing the app on the internet, NOT through the App Store
- Running the process on your local computer AND on Github Actions
If this is not your setup, maybe this guide can still be useful, but be aware of any difference
Terminology
Signed Application:
A signed application refers to a macOS application that has been digitally signed by its developer using an Apple-issued certificate. Code signing is a security feature implemented by Apple to ensure that the application comes from a trusted source and hasn't been tampered with since it was created. When an application is signed, it carries a cryptographic signature that can be verified by macOS to confirm its authenticity. This process helps to protect users from downloading and running malicious software.
Notarized Application:
A notarized application is a macOS application that has undergone additional scrutiny by Apple's notary service. Notarization is an optional but highly recommended process for developers distributing their apps outside of the Mac App Store. When a developer submits their application for notarization, Apple checks it for malicious code and other security threats. If the application passes these checks, Apple issues a ticket that confirms its notarization. Notarized applications provide an extra layer of assurance for users, indicating that the app has been scanned for security issues by Apple. Additionally, macOS Catalina and later require notarization for all applications to run by default, further enhancing security for Mac users.
Pre-requirements, Certificates, and a Dive into Apple Hell
To sign our application, we need a certificate from Apple, which requires setting up a (paid) developer account. Here's a step-by-step guide to obtaining and managing the necessary certificates:
1. Set Up Your Apple Developer Account
First, head to the Apple Developer Account and create an account. You have the option to set up your account as a solo developer or as part of a team. Note that only the team owner can generate the necessary certificate if you're part of a team.
2. Obtain the Developer ID Application Certificate
To distribute your application outside the App Store, you only need the "Developer ID Application" certificate. Follow these steps:
Navigate to the Certificate Page: Go to the Apple Certificates, Identifiers & Profiles page.

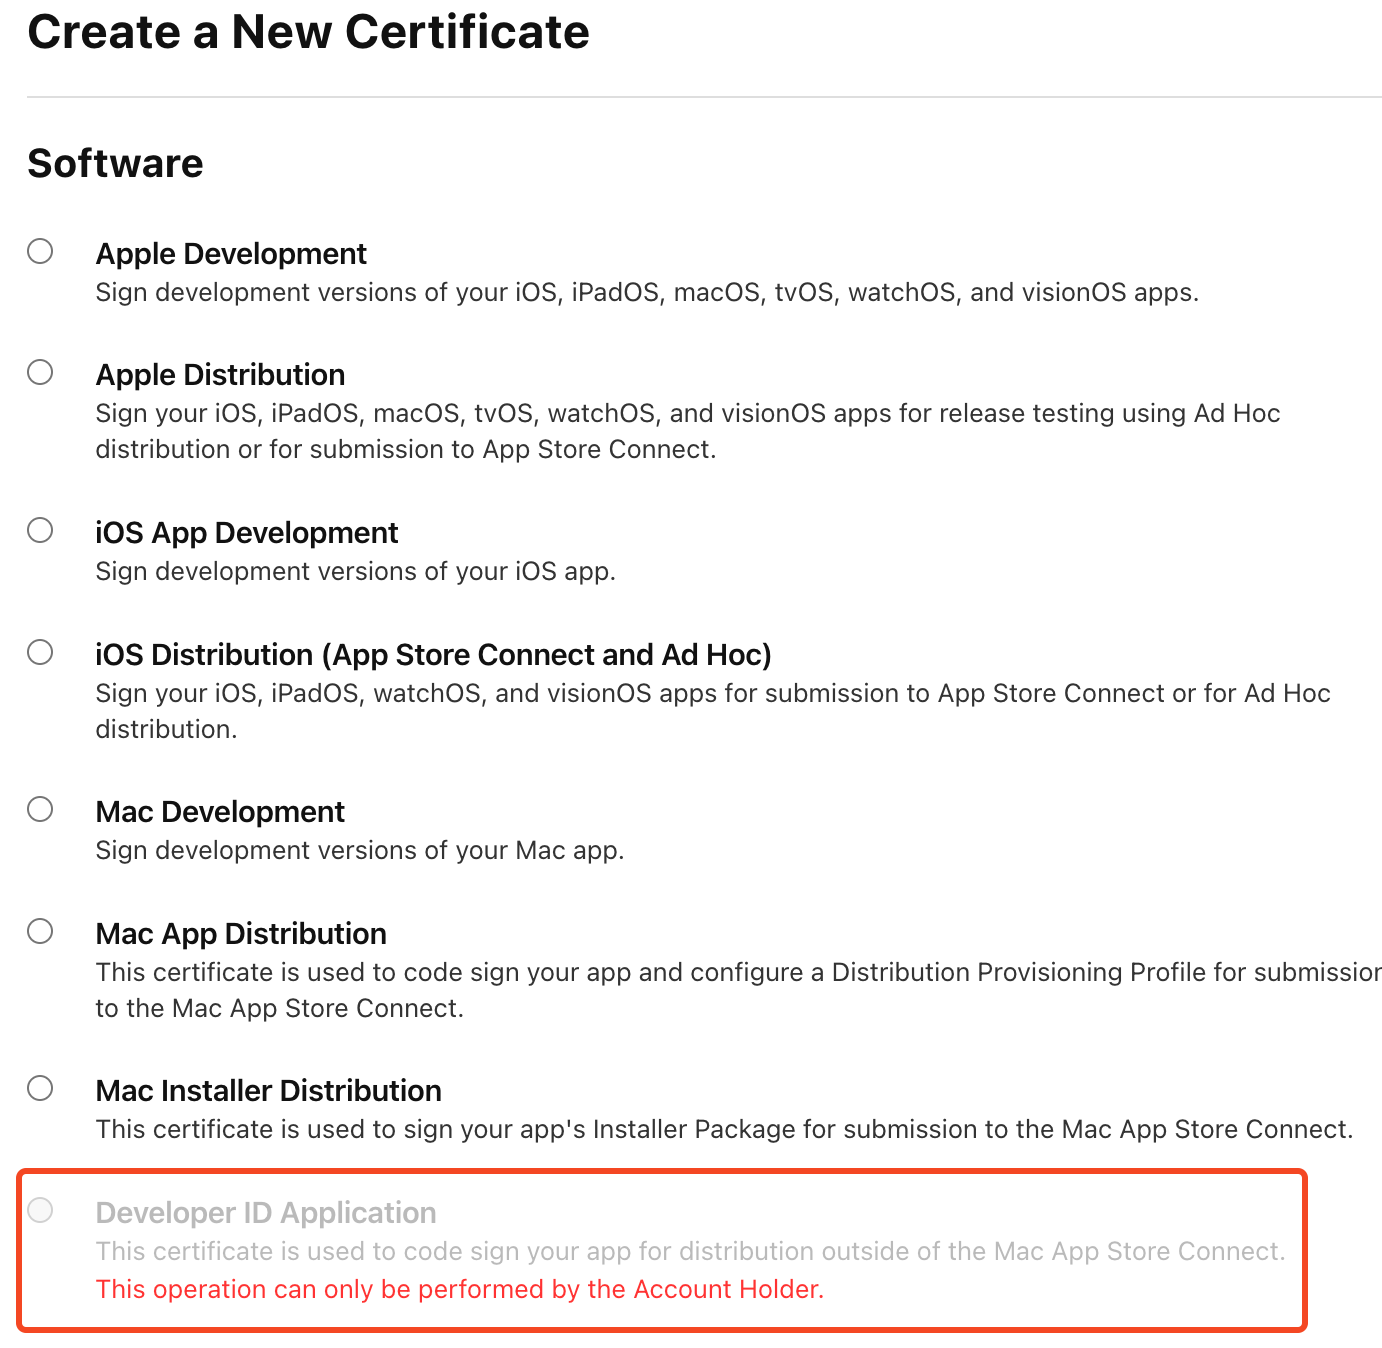
Create the Certificate: Select and create the Developer ID Application certificate.

As shown in the image, if you are not the team owner, you will not have the option to create the certificate. In this case, ask the team owner to generate it.
Now, you need to export the certificate but there's one key information:
Only the creator of the certificate can CORRECTLY export it
So, being the certificate creator, let's go on.
Download the Certificate: Once the certificate is created, download it.

After downloading your certificate, import it into your keychain. Later, when we integrate with GitHub Actions, we'll need to export this certificate. Only the certificate's creator can export it correctly. If you need to share the certificate with teammates, ensure it is exported by the creator, as only their export will be valid.
3. Import and Manage the Certificate in Keychain
Import the Certificate: Open the downloaded certificate file to start the import process into your Keychain. Ensure it is imported into the "System" section of your Keychain.

Set Access Control: For the signing tool to access the certificate, it needs to be available to all applications. To set this:
- Uncollapse the certificate in Keychain Access.
- Click on the "private key" and select "Get Info."
- In the new window, select the "Access Control" tab and enable "Allow all applications to access this item."

4. Generate an App-Specific Password
For added security, especially when integrating with CI/CD pipelines like GitHub Actions, generate an app-specific password:
- Go to the Apple ID account page.
- Choose Generate an app-specific password.
- Create and note down the generated password for later use.
5. Locate Your Team ID
If you're part of a team, you'll need the team ID for notarization. Find it on the Certificates, Identifiers & Profiles page, located in the top right corner next to the team name.

With these steps completed, you are now ready to configure your Electron application for signing and notarizing. In the next sections, we’ll dive into the specifics of configuring electron-builder and integrating with GitHub Actions.
Local signing and notarizing
One key thing to bear in mind is that signing and notarizing an app is done through accessing your keychain. This is why you will never need to point directly to the certificate file. On GitHub Actions, we'll somehow build a new keychain that will be populated with our certificates. Locally, we've all we need, so it's just a matter of configuring electron-builder.
Open your elctron-builder.json file and add or modify these lines:
Let's see all the options one by one.
afterSign: The notarization script; we're going to create this file soon.
entitlements and entitlementsInherit: Point to the entitlements plist files. We'll see their content in a moment.
notarize: We set this to false because we're going to use an external tool to notarize the app.
gatekeeperAssess: This avoids an extra check of the signing. I think setting it to true is valid as well.
hardenedRuntime: Only applications that run with the hardened runtime (a more strictly secure runtime) can be notarized.
dmg sign: We are going to sign the .app file, notarize it and then pack it into a dmg. There's no need to also sign the dmg.
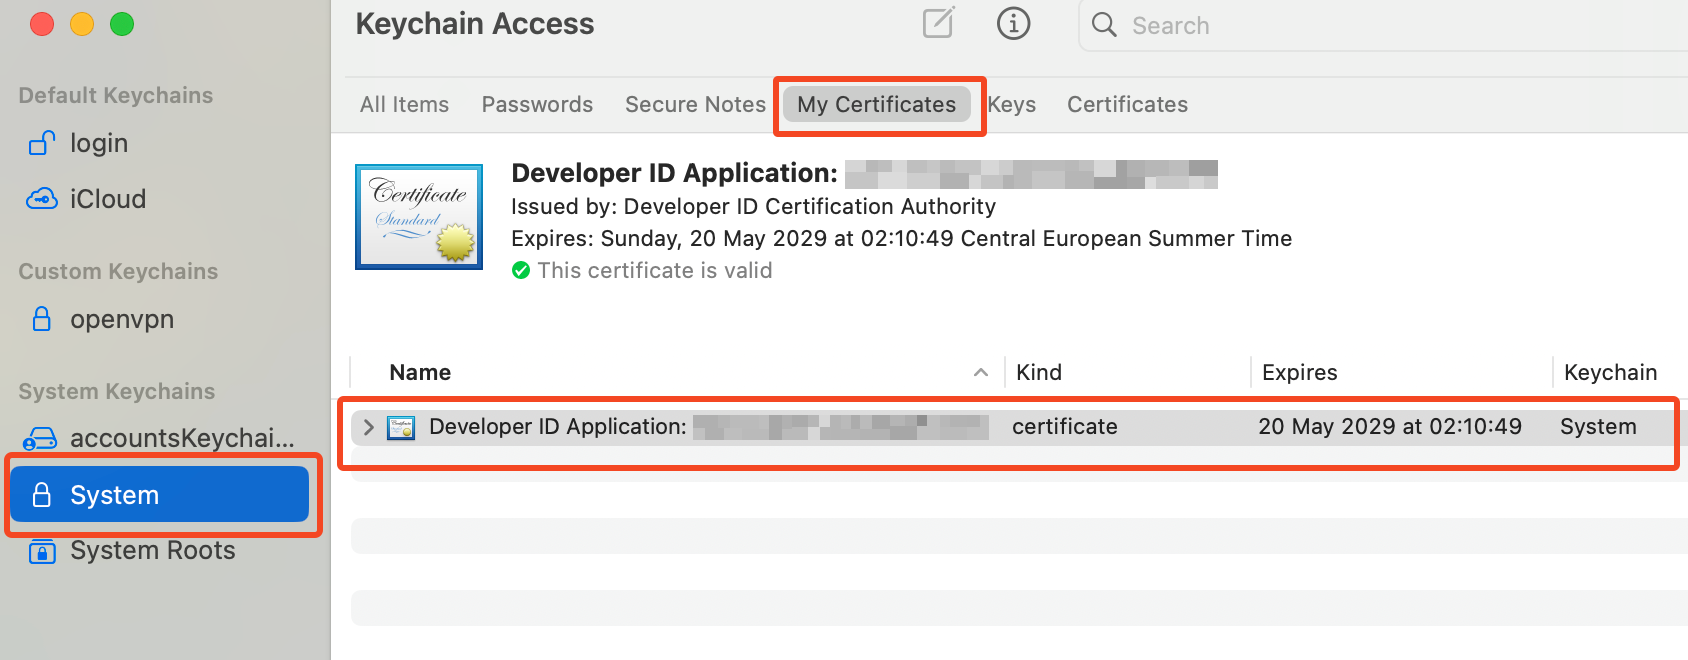
identity: The identity lets the sign tool identify the certificate to use. The identity is a string and you can find it in your certificate description in your keychain. The certificate is called
Developer ID Application: {IDENTITY} ({CODE}). You need the identity bit, like in the figure below

Now it's time to create that entitlements.mac.plist file. It can contain any specific code for your application, but it should also contain:
It's not very clear to me how much of this is mandatory. If you have any observations, leave a comment.
Let's now create the notarize script. This script is taking care of notarizing the application. The notarization process sends your .app file to Apple servers that stamp your file and return it. This process may take some minutes, don't give up. First, let's install @electron/notarize.
npm install @electron/notarize
Now let's create a notarize.js in the root of your project. This is the content:
As you can see, we need three environment variables
APPLE_ID: Your Apple ID, usually your email.
APPLE_ID_PASSWORD: Do not use your main password. Instead, use the application password we created here
APPLE_TEAM_ID: This is optional. If you're signing the app as being part of a team, insert your team ID. I explained how to get it here
You've all you need. Let's run the electron build process. What's going on is:
- Electron builder will build your app
- The certificate is located automatically in your keychain
- The .app file is signed
- The signed app is sent to apple servers for notarization
- The signed/notarized app is packaged in a .dmg file
Anything can go wrong, of course. Here are some problems I faced:
- The script keeps asking me for credentials to access/modify the keychain: Your certificate has not been given access to all applications.
- Notarization fails: Any of the variables in the notarize script is incorrect.
Finally, it's time to run the script (I'm skipping any other step needed in your specific app)
As you can see, I set up the needed environment variables inline. You can export them before running the script or use any other preferred technique.
If everything goes well, you'll see an output similar to the following:
The process can take a few minutes, so just hold on.
Next steps
Congratulations on successfully signing and notarizing your Electron app for macOS! By following these steps, you have ensured that your application meets Apple’s security requirements and is ready for distribution outside the App Store.
The next step is to automate this entire process using GitHub Actions. This will streamline your workflow, making it easier to maintain and distribute your app. In the upcoming part of this guide, I will provide detailed instructions on setting up GitHub Actions to handle the signing and notarizing process automatically.
Stay tuned for the next part, and feel free to reach out with any questions or comments in the meantime. If I haven't published the guide soon, don't hesitate to nudge me! Happy coding!

